
tl;dr skip to Snap Installation
Introduction Link to heading
It was my plan from the start to set up a Gitea instance on this blog. I like Gitea a lot as an independent open-source, self-hosted Git instance. I also like Snaps, I know they get a lot of flack, mostly due to the proprietary backend (🤮), common misconfigurations (leading to no-access outside $HOME), and other problems. However, I’ve also had a lot of success with Snaps on Ubuntu and I think it’s a noble attempt to improve security and resolve dynamic-linking problems in software.
Anyway, when I checked Gitea’s list of official installation methods they listed Snap as an option:
So, I thought, brilliant I’ll use that, easy. However, you might notice, the lack of accompanying documentation…
I’m not cutting anything out of the picture here, that’s literally all I’ve been given snap install gitea.
No indication of connections available, configurations used, database method, or even what the snap actually installs, does it host a web-server? What port is it on? There is no info that I can find, which is the main reason I’ve written this article.
To make matters worse, Snap is missing some key features on their website. This web-page is beautifully designed and painfully useless. This is partly the fault of Gitea who included no documentation about this snap, but there’s also a big chunk missing from Canonical here. At the bare minimum, I expect the Snapcraft website to tell me:
- The entire
snapcraft.yamlcontents. - Commands and apps.
- Connections, plugs and sockets.
- Supported architectures.
- Services.
This info is already known by Snap because it has to be specified in the snapcraft.yaml, you can even query it through their API! Other than that, so far as I can tell it’s impossible to find out without actually installing the snap first.
Figuring it out. Link to heading
So anyway, we’re on our own, OK whatever we can figure this out ourselves!
The snapcraft.yaml Link to heading
First, let’s take a look at the snapcraft.yaml, for those not aware, when you build a snap you create a file called snapcraft.yaml that defines everything inside, what it does, where it goes what permissions it needs etc. Luckily, I already know that snaps are stored in /snap and the YAML will be located under /snap/<app name>/current/snap/snapcraft.yaml
cat /snap/gitea/current/snap/snapcraft.yaml
name: gitea
summary: Gitea - A painless self-hosted Git service
description: |
  The goal of this project is to make the easiest, fastest, and most painless
  way of setting up a self-hosted Git service. With Go, this can be done with
  an independent binary distribution across ALL platforms that Go supports,
  including Linux, Mac OS X, Windows and ARM.

icon: public/img/logo.png
confinement: strict
base: core18
adopt-info: gitea

architectures:
  - build-on: armhf
  - build-on: amd64
  - build-on: arm64

environment:
  GITEA_CUSTOM: "$SNAP_COMMON"
  GITEA_WORK_DIR: "$SNAP_COMMON"
  GIT_TEMPLATE_DIR: "$SNAP/usr/share/git-core/templates"
  GIT_EXEC_PATH: "$SNAP/usr/lib/git-core"

apps:
  gitea:
    command: gitea
    plugs: [network, network-bind, removable-media]
  web:
    command: gitea web
    daemon: simple
    plugs: [network, network-bind, removable-media]
  dump:
    command: gitea dump
    plugs: [home, removable-media]
  version:
    command: gitea --version
  sqlite:
    command: usr/bin/sqlite3

parts:
  gitea:
    plugin: make
    source: .
    stage-packages: [ git, sqlite3, openssh-client ]
    build-packages: [ git, libpam0g-dev, libsqlite3-dev, build-essential]
    build-snaps: [ go, node/18/stable ]
    build-environment:
      - LDFLAGS: ""
    override-pull: |
      snapcraftctl pull

      last_committed_tag="$(git for-each-ref --sort=taggerdate --format '%(tag)' refs/tags | tail -n 1)"
      last_released_tag="$(snap info gitea | awk '$1 == "latest/candidate:" { print $2 }')"
      # If the latest tag from the upstream project has not been released to
      # stable, build that tag instead of master.
      if [ "${last_committed_tag}" != "${last_released_tag}" ]; then
        git fetch
        git checkout "${last_committed_tag}"
      fi
OK, lots of useful info in here, for example we can see this snap provides the apps, gitea, web, dump, version and sqlite.
This means once the snap is installed we can run these as commands using:
snap run gitea.<app name>`, helpfully some of these commands have help files:
```plaintext
snap run gitea.web --help
NAME:
   gitea web - Start Gitea web server
...

snap run gitea.gitea --help
NAME:
   Gitea - A painless self-hosted Git service
...

snap run gitea.dump --help
NAME:
   gitea dump - Dump Gitea files and database
...

snap run gitea.sqlite --help
Usage: /snap/gitea/6473/usr/bin/sqlite3 [OPTIONS] FILENAME [SQL]
...
Useful, now we have some info as to what’s going on. Some of these commands can also be run without the preceding snap run
gitea <app name>
gitea web
gitea dump
Some of the commands also do not have a help page, such as version, but we can see from the YAML that it just runs gitea version which prints the version of our Gitea instance… although it doesn’t seem to work, possibly they are still working on this one, or it might be used internally by Gitea.
The Web Server Link to heading
So, we know there is a web-server bundled. We also know that it’s running on port 3000, because when I run gitea it complains that port 3000 is in-use.
But how? Where is the service that defines this web-server? Well, turns out it’s systemd and I found it by running sudo systemctl status *gitea*. This returned info on three services:
- snap.gitea.web.service
- run-snapd-ns-gitea.mnt.mount
- snap-gitea-6473.mount
Of which only the first one is actually a service, the others are magical systemd components we don’t need to write down. Let’s take a look at what’s inside the service file:
cat /etc/systemd/system/snap.gitea.web.service
[Unit]
# Auto-generated, DO NOT EDIT
Description=Service for snap application gitea.web
Requires=snap-gitea-6473.mount
Wants=network.target
After=snap-gitea-6473.mount network.target snapd.apparmor.service
X-Snappy=yes

[Service]
EnvironmentFile=-/etc/environment
ExecStart=/usr/bin/snap run gitea.web
SyslogIdentifier=gitea.web
Restart=on-failure
WorkingDirectory=/var/snap/gitea/6473
TimeoutStopSec=30
Type=simple

[Install]
WantedBy=multi-user.target
Yep, that’s definitely our snap, if I knew more about how the snapcraft.yaml worked then I could’ve worked this out from the daemon: simple indicator under the web app definition.
This Systemd service hasn’t actually told us much information, but you know what? I don’t care. We actually have everything we need now:
- We know what commands are available.
- We know that the snap is running a web-server on port 3000.
- We know it’s designed to use SQLite as the database.
These key pieces of information are everything we need to know that we need to set up a reverse-proxy with Nginx and to use SQLite as the right database engine when configuring Gitea.
Now, onto the actual setup procedure. 🚀
Snap Installation Link to heading
- Just go right ahead and install Snappy if you don’t have it:
sudo apt update sudo apt install snapd - Install Gitea:
Once Gitea finishes installing it will host a web-server on port 3000 that is your Gitea instance. No need to worry about how this works, snap will take care of everything from maintenance to updates (probably).
sudo snap install gitea
Nginx setup Link to heading
This guide assumes you already have an NGINX web server setup and running, including the server blocks configuration; if not, see this great guide from Digital Ocean.
HTTPS (Encrypted) Link to heading
If you’ve also setup Nginx for SSL encryption over HTTPS then follow this section. If you want to use HTTPS but haven’t set it up yet, then Digital Ocean has another great guide to follow. Otherwise, skip to the HTTP guide
-
Create your new server-block for Gitea:
sudo nano /etc/nginx/sites-available/gitea.conf -
Paste in the following:
server {
    listen 80;
    listen [::]:80;

    server_name <site name>;

    ### SSL CONFIGURATION ###
    location /.well-known/ {
        default_type "text/plain";
        allow all;
        root /var/www/html/;
    }

    location / {
        return 301 https://<site name>$request_uri;
    }

    access_log /var/log/nginx/gitea-access.log;
    error_log /var/log/nginx/gitea-error.log;

}

server {

    listen 443 ssl http2;
    listen [::]:443 ssl http2;

    include /etc/nginx/snippets/ssl-<Site Name>.conf;
    include /etc/nginx/snippets/ssl-params.conf;

    server_name <site name>;

    access_log /var/log/nginx/gitea-access.log;
    error_log /var/log/nginx/gitea-error.log;

    ### SSL CONFIGURATION ###
    location /.well-known/ {
        default_type "text/plain";
        allow all;
        root /var/www/html/;
    }

    location = /robots.txt {
        add_header Content-Type text/plain;
        return 200 "User-agent: *\nDisallow: /\n";
    }

    location / {
        proxy_pass http://localhost:3000;
        proxy_set_header Host $host;
        proxy_set_header X-Real-IP $remote_addr;
        proxy_set_header X-Forwarded-For $proxy_add_x_forwarded_for;
        proxy_set_header X-Forwarded-Proto $scheme;
        client_max_body_size 16M;
    }

}
Some parts of this configuration are not necessary, if you’re already familiar with using NGINX configs and have you own standard format then feel free to just include the reverse-proxy section and ignore everything else.
- The first
serverblock is just for redirecting HTTP to HTTPS.- The
### SSL CONFIGURATION ###part allows access for Let’s Encrypt certbot challenges to work even while SSL is disabled.
- The
- The second
serverblock is what serves the actual site content.- The two
includeparameters import SSL configurations from the snippets folder, see below for detail. - The same
### SSL CONFIGURATION ###as before helps with certbot challenges. - The
robots.txtsection tells NGINX to serve a “disallow all” robots file at this URL. This is useful for telling search engines to not index this webpage. If you want your Gitea instance to appear in search results then you can remove this section. - The final location block is the reverse-proxy configuration, taken from the official Gitea documentation.
- This configuration stores all access and error logs inside
/var/log/nginx/, separating logs between sites helps with troubleshooting and analytics.
- The two
- The first
-
Go through the config and replace any instances of
<site name>with your website address, e.g. mine isgitea.hugolee.xyz -
Create the two snippet files if you don’t have them already. In Nginx “snippets” are portions of config files that you can create once and then include into multiple different configs. This makes it easy to standardise settings across lots of sites at once. Here, I’ve used snippets to configure SSL parameters. There are two separate files in use:
-
/etc/nginx/snippets/ssl-<Site Name>.conf. This snippet contains only two lines:ssl_certificate /etc/letsencrypt/live/<Site Name>/fullchain.pem; ssl_certificate_key /etc/letsencrypt/live/<Site Name>/privkey.pem;These two directives tell NGINX where my SSL Certificate and Key is located, for me these files were created automatically by certbot when I set up SSL. Your configuration may differ but, I recommend keeping to the same format as it’s very useful.
nano /etc/nginx/snippets/ssl-<Site Name>.confPaste in the contents from above, change the file path to the location of your certificate and key. If you used cert-bot you can double-check the name of the directory:
sudo ls -al /etc/letsencrypt/live -
include /etc/nginx/snippets/ssl-params.conf. This snippet contains a bunch of configurations for secure SSL setup:ssl_protocols TLSv1.3 TLSv1.2;# Requires nginx >= 1.13.0 else use TLSv1.2 ssl_prefer_server_ciphers on; ssl_dhparam /etc/ssl/certs/dhparam.pem; # openssl dhparam -out /etc/ssl/certs/dhparam.pem 4096 ssl_ciphers EECDH+AESGCM:EDH+AESGCM; ssl_ecdh_curve secp384r1; # Requires nginx >= 1.1.0 ssl_session_timeout 10m; ssl_session_cache shared:SSL:10m; ssl_session_tickets off; # Requires nginx >= 1.5.9 ssl_stapling on; # Requires nginx >= 1.3.7 ssl_stapling_verify on; # Requires nginx => 1.3.7 resolver 51.158.108.203 195.10.195.195 valid=300s; resolver_timeout 5s; add_header Strict-Transport-Security "max-age=63072000; includeSubDomains; preload"; add_header X-Frame-Options SAMEORIGIN; add_header X-Content-Type-Options nosniff; add_header X-XSS-Protection "1; mode=block";You can probably use this file as-is, just make note of the dhparam command below:
nano /etc/nginx/snippets/ssl-params.confPaste in the contents from above, These settings change how NGINX behaves in a number of ways, it’s based on this useful site:
ssl_protocolsis telling Nginx to use only versions 1.3 and 1.2.ssl_prefer_server_ciphers, tells Nginx to prefer server ciphers over client ciphers. Enabling this allows us to ensure strong encryption is being used wherever possible.ssl_dhparam, specifies which files of DH Parameters to use for DH key-exchanges. More info here.
You might not have this file already, in which case you can easily make one by running this command:Beware it can take a long time to complete.sudo openssl dhparam -out /etc/ssl/certs/dhparam.pem 4096ssl_ciphers, specifies which encryption ciphers NGINX will use. This is always a balance in security and compatibility, some old browsers won’t support newer and stronger ciphers.ssl_ecdh_curve, a mechanism of ECDH.ssl_session_timeout, after this timeout is complete, the client must renegotiate encryption with the server.ssl_session_cache, tells nginx the type of session cache to use and how long to keep it.ssl_session_tickets, disables TLS session tickets, which are probably insecure.ssl_stapling, part of ensuring SSL certificates are valid.ssl_stapling_verify, tells Nginx to verify that valid SSL certificates are definitely valid.resolver, tells NGINX what DNS servers to use to resolve domain names, here it’s configured to use OpenNIC’s DNS servers. You could also use Cloudflare’s1.1.1.1or Google’s8.8.8.8if you prefer.add_header, adds additional headers to each reply:Strict-Transport-Security, ensures only HTTPS is used when it is meant to be used.X-Frame-Options SAMEORIGIN;, the X-Frame header helps avoid clickjacking.
SAMEORIGINallows embedded web-pages hosted on the same server.X-Content-Type-Options nosniff, prevents some content-sniffing methods.X-XSS-Protection "1; mode=block", used for preventing XSS vulnerabilities, seems controversial though, might remove it.
-
-
Link your new site config into the sites-enabled directory:
sudo ln -s /etc/nginx/sites-available/gitea.conf /etc/nginx/sites-enabled/ -
Test that the configuration is correct:
sudo nginx -tIf there are any issues NGINX will tell you about them here.
If it complains that I can’t finddhparam.pemthen you just need to run:sudo openssl dhparam -out /etc/ssl/certs/dhparam.pem 4096 -
Assuming there are no issues, go ahead and reload NGINX, then the site will be live:
sudo systemctl reload nginx
HTTP (Unencrypted) Link to heading
If you’re just using HTTP with no encryption then use this guide.
-
Create your new server-block for Gitea:
sudo nano /etc/nginx/sites-available/gitea.conf -
Paste in the following:
server { listen 80; listen [::]:80; server_name <site name>; access_log /var/log/nginx/gitea-access.log; error_log /var/log/nginx/gitea-error.log; location = /robots.txt { add_header Content-Type text/plain; return 200 "User-agent: *\nDisallow: /\n"; } location / { proxy_pass http://localhost:3000; proxy_set_header Host $host; proxy_set_header X-Real-IP $remote_addr; proxy_set_header X-Forwarded-For $proxy_add_x_forwarded_for; proxy_set_header X-Forwarded-Proto $scheme; client_max_body_size 16M; } }- The
robots.txtsection tells NGINX to serve a “disallow all” robots file at this URL. This is useful for telling search engines to not index this webpage. If you want your Gitea instance to appear in search results then you can remove this section. - The final location block is the reverse-proxy configuration, taken from the official Gitea documentation.
- This configuration stores all access and error logs inside
/var/log/nginx/, separating logs between sites helps with troubleshooting and analytics.
- The
-
Link your new site config into the sites-enabled directory:
sudo ln -s /etc/nginx/sites-available/gitea.conf /etc/nginx/sites-enabled -
Test that the configuration is correct:
sudo nginx -tIf there are any issues NGINX will tell you about them here.
-
Assuming there are no issues, go ahead and reload NGINX, then the site will be live:
sudo systemctl reload nginx
Gitea Initial Configuration Link to heading
Now that your site is live you just need to complete the initial configuration, and you’re good to go!
-
Navigate to your Gitea site, e.g. mine is https://gitea.hugolee.xyz
-
You will be presented with the initial configuration page, in the first section you need to configure the Database Type, set this to
SQLite3. It will automatically configure the correct Path for you: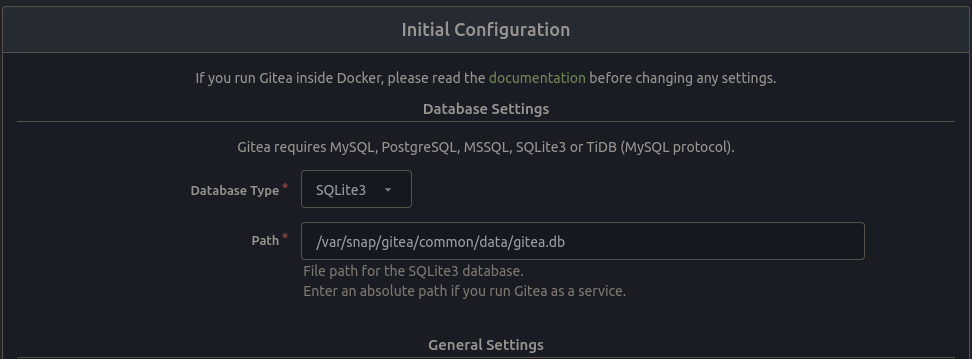
-
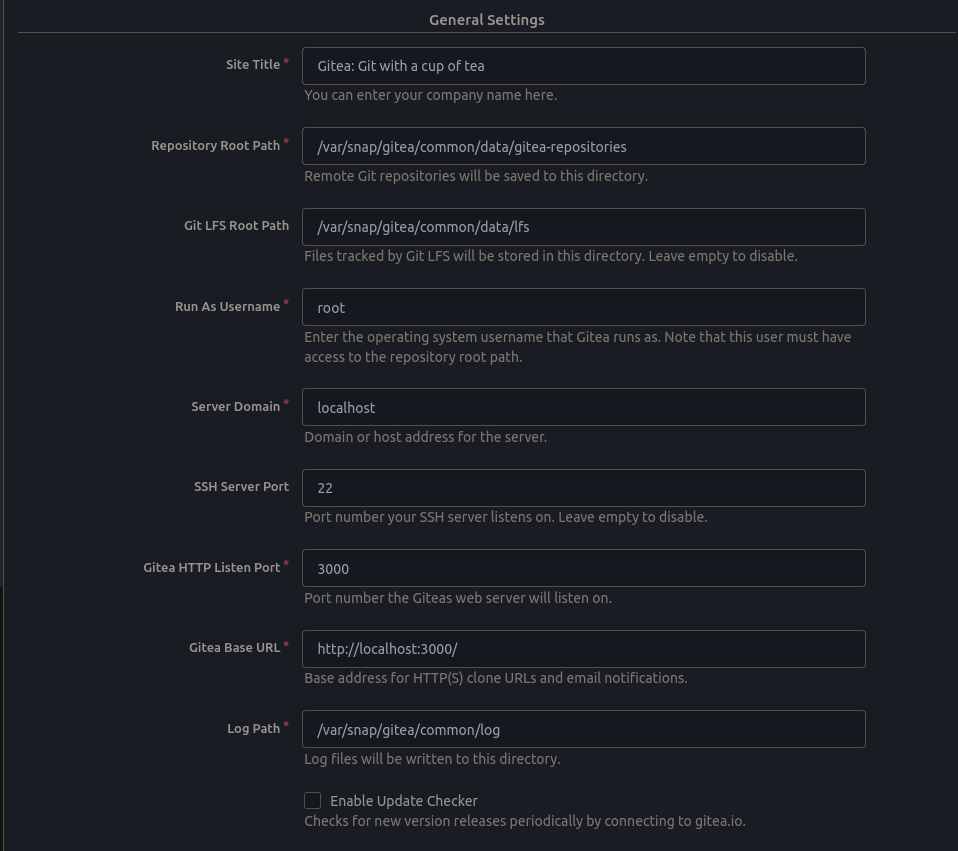
In the next section you can configure the General Settings, feel free to change the Site Title, I do not recommend modifying any other settings:
-
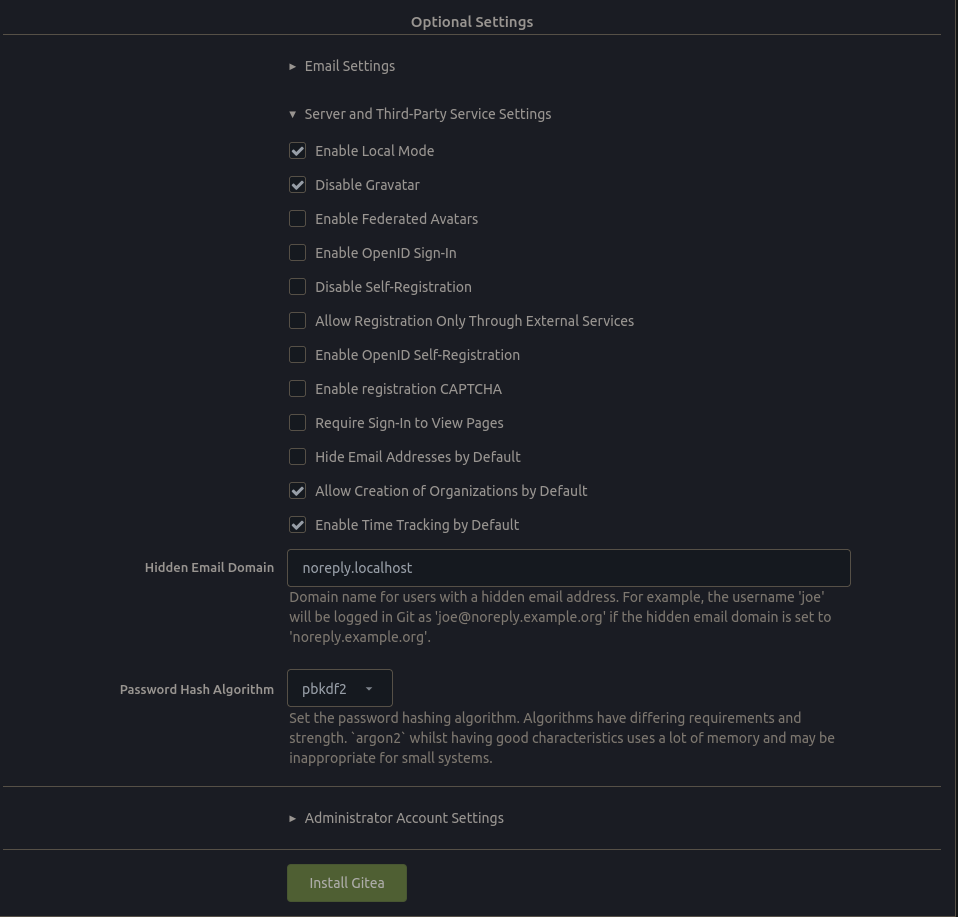
In the Optional Settings section you can configure Email, server and third-party settings, and create an Administrator account.
- If you have email configured already then enter your SMTP settings here, DigitalOcean has a good guide on how you can configure Postfix for email.
- I recommend enabling
Local Modewhich disables reliance on third-party features like Gravatar which can be used to track your usage. - I would also recommend disabling
Self-Registration,OpenID Sign-InandOpenID Self-Registrationto prevent people from signing up to your site and creating repositories themselves. - You should create and Administrator account now to save having to do it later.
-
Finally, click Install Gitea and wait for it to complete!
SSH setup Link to heading
By default, Gitea will try to use the built-in SSH server to authenticate users as they try to push, pull or execute other git commands that need authorisation. But, this isn’t going to work…
Instead, you’ll need to enable Gitea’s built-in SSH server and have it use a port other than 22.
-
Open the Gitea app.ini file for editing:
sudo nano /var/snap/gitea/common/conf/app.ini -
Locate the line
SSH_PORT = 22within the[SERVER]heading, and change it toSSH_PORT = 2002, other another port you like; just be sure it’s not in use already. -
Underneath
SSH_PORTadd this line:START_SSH_SERVER = true -
Now, restart the Gitea server:
sudo systemctl restart snap.gitea.web.service -
If you’ve enabled a firewall you’ll also need to add an exception for this new port:
sudo ufw allow 2002
That’s it, Gitea will now automatically add this port to the URL of remote repositories. If you’ve already added a git remote to your project, you’ll need to remove it and re-add it, for example:
git remote remove origin
git remote add origin root@<site name>:<port number>/<username>/<repo name>
You’re done! Congratulations on taking a step towards independence from centralised services with your very-own self-hosted git site 🎉 🎊
Useful information Link to heading
A lot of people aren’t familiar yet with where Snap stores its files, so here you can find a list of useful locations and configuration files for Gitea.
Config files and storage paths Link to heading
First off, if you navigate to https://<site>/admin/config you’ll get a list of Gitea’s configuration, including the below file locations.
- Gitea App Configuration file:
/var/snap/gitea/common/conf/app.ini - App Data Path:
/var/snap/gitea/common/data - Repository Root Path:
/var/snap/gitea/common/data/gitea-repositories - Custom File Root Path:
/var/snap/gitea/common - Log Path:
/var/snap/gitea/common/log - LFS Content Path:
/var/snap/gitea/common/data/lfs - SQLite Database location:
/var/snap/gitea/common/data/gitea.db
Creating Gitea backups. Link to heading
With the Gitea snap you have two options either:
-
Create a Snap Snapshot, which will include all Gitea files, databases, directories etc.
-
Manually backup important Gitea files.
Snapshots Link to heading
The Snap architecture includes a built-in method of saving Snaps and their data. This guidance was built upon this blog from Igor Ljubuncic at Canonical.
- Run the snap save command:
sudo snap save gitea
That’s it. You can view your saves by running:
sudo snap saved
Delete them by running:
sudo snap forget <Set number> gitea
To restore a backup run:
sudo snap restore <Set number> gitea
Manual Backup Link to heading
This method is the more traditional approach, and will be more useful if you need to restore data to a different Gitea instance at a later date, as well as potentially moving to a non-snap installation in future. It’s based on this official guide.